
Future of generative AI in Fashion
10 February 2022An access service for a new archival era | The National Archives
15 March 2022Calculating objects size from point cloud data – ARKit on iOS
A short tutorial how to extract and process RGB+Depth data from iOS devices equipped with infrared sensors, most notably the Pro lines of iPads and iPhones.

# Code is poetryOn a recent client project, we used iOS's ARKit library to support an AI application which automatically recognises and measures the size of structural defects in civil engineering structures, such as tunnels and bridges. We decided to write a short tutorial how one can extract and process RGB+D data from iOS devices equipped with infrared sensors, most notably the Pro lines of iPads and iPhones.
On professional projects for our clients, we have traditionally been using industry grade equipment, such as Leica's Pegasus Sensor Platform to capture digital twins of civil infrastructures. However, the addition of a LiDAR sensors to Apple devices presents some interesting opportunities. The infrared camera on iPhone 12 Pro and later models is a stunningly powerful piece of engineering, especially in consideration of its small size and affordable price point, when compared to professional LiDAR equipment. So far, Apple's hardware appears to have been underappreciated, likely due to the lack of software applications which make use of the full potential of the sensor but that presents a lot of opportunities.
At the time of writing this article, there wasn't an obvious solution or other tutorials which showed the process of capturing and estimating the size of objects from images by correlating depth and visual data streams on the iOS platform. We hope the current blog post can prove useful for anyone else who is interested in calculating the sizes of objects from RGB images on iOS.
CONTENTS
The blog post is organised in a few short parts:
- Key Concepts: A primer of basic terms
- Key Ingredients: Briefly explaining what data we get from iPhone's camera sensors
- 3D Point Cloud: Introducing a short Python function for transforming RGB+D data to a 3D model of our environment
- Estimating Object Sizes: Introducing a Python method to estimate the size of an object detected in an RGB image. The method effectively translates a 2D bounding box to 3D space
Key Concepts
If you are new to working with RGB+D data and iPhone's ARKit library, here are some basics.
The ARKit Library is Apple's Augmented Reality (AR) Library that allows developers to access RGB+D data on devices with an infrared camera, such as an iPhone 12 Pro, which we used in our initial testing. RGB+D represents two synchronized streams of RGB (visible light, decomposed in its Red, Green, Blue components) and Depth (infrared light) data.
Visual data can be processed raw, through usually it is more convenient to work with a lossy photo format such as JPEG or a compressed video format like H.264 or H.265 (MP4). Depth data can be stored as a 16-bit grayscale image, which is great for reduced file size at the expense of some loss in precision. Depth data can also be accessed, processed and stored in a raw format such as an array. Each entry in a depth array, or pixel of a depth image, represents the relative distance from a point in the environment to the center of the camera.
Key Ingredients: RGB+D data and camera intrinsics
To calculate object sizes, we need the following raw data which we can get from our iPhone camera with the help of iOS's ARKit library:
- RGB Data from the standard camera of the device. In our case each frame is stored as a 1920x1440 RGB image in PNG file format.
- Depth Data whose values represent the distance from the camera to objects in the environment. In ARKit this is a depthMap, which holds estimations of the distance from the device to its environment in meters. We chose to process those arrays as grayscale 256x192 PNG images.
- Itrinsics Matrix which holds camera properties such as focal length. In ARKit, the intrinsicMatrix is a 3x3 matrix which relates the camera’s internal properties to an ideal pinhole-camera model.
3D Point Cloud: Making a 3D model of our environment
Let's define a small Python function which will use the camera intrinsics matrix and transforms the depth image map into a 3D point cloud of our environment.
For each RGB frame recoded by our iOS device, we get a respective depth image and an intrinsics matrix. The intrinsic matrix gives us the (x,y) camera sensor centre and the focal length in the x and y direction.
import open3d as o3d
import numpy as np
from PIL import Image

def depth_to_pcd(rgb: np.array, depth: np.array, intrinsic: np.array):
    """Transform a depth image into a point cloud using intrisincs matrix."""

    # Get shapes of images
    rgb_width, rgb_height, depth_width, depth_height = rgb.shape, depth.shape

    # Extract FoV & centers
    cx, cy, fx, fy = camera_params_from_intrinsic(intrinsic, rgb_shape, depth_shape)

    # Resize RGB to depth resolution
    rgb = Image.fromarray(rgb)
    rgb = o3d.geometry.Image(np.array(rgb.resize((depth_height, depth_width))))

    # Create RGBD object, then PCD
    rgbd = o3d.geometry.RGBDImage.create_from_color_and_depth(rgb, depth, convert_rgb_to_intensity=False)
    pcd = o3d.geometry.PointCloud.create_from_rgbd_image(rgbd, intrinsic)

    return pcd
We also need a helper function which extracts the focal length and camera centre point from the camera intrinsic matrix. Note that the depth camera has a significantly lower resolution than the RGB camera. We need to remember to scale the camera parameters according to the respective resolutions of each sensor.
def camera_params_from_intrinsic(intrinsic: np.array, rgb_width: float, rgb_height: float, depth_width: float, depth_height: float):
    """Extract camera parameters needed from intrinsic array & scale them according to depth & RGB."""

    # Get resolution of RGB & depth to scale
    scale_h, scale_w = depth_height/rgb_height, depth_widht/rgb_width #256/1920, 192/1440 in this case

    # Camera center
    cx, cy = intrinsic[2, 0] * scale_w, intrinsic[2, 1] * scale_h

    # Camera FOV
    fx, fy = intrinsic[0, 0] * scale_w, intrinsic[1, 1] * scale_h

    return cx, cy, fx, fy
Estimating Object Sizes: From 2D bounding box to object size
We will introduce three functions that will help us get the dimension of an object given its bounding box on an RGB image. In a production application, the bounding box data will likely be available from another ML model, such as an object detection model.
Calculating a 3D bounding cage from 2D bounding box
The first function takes a bounding box defined by 4 points. We need to find the points in our 3D Point Cloud Data which fall within the bounds of the box.
We create a mask which marks the points inside the bounding box.
# box = [x1, y1, x2, y2]
mask = np.zeros((depth_height, depth_width), dtype=np.uint8) # initialize mask
mask[box[1]:box[3],box[0]:box[2]] = 255 # fill with white pixels
Next, we want to select the indices which fit in the bounding box. We can use np.where.
# Get x & y indices in the mask
indices = np.where(mask == 255)
# Now, find these indices in the point cloud
pcd_indices  = [indices[0][i] * depth_width + indices[1][i] for i in range(len(indices[0]))]
Finally, we get a 3D bounding cage by filtering the point cloud data and finding a bounding cage of the smallest possible volume which fits all points which define our object of interest.
# Crop points by index & get bounding box
crop = pcd.select_by_index(indice_list)
boundingbox_3d = crop.get_minimal_oriented_bounding_box()

boundingbox_3d.color = (1.0, 0.0, 0.0)
Now we have a 3D cage which defines our object of interest.

Putting everything together & finding object sizes
Now that we have a bounding cage, we can use its 8 vertices and calculate the pairwise euclidean distance between them. By picking a point we can find 3 other points which make up the 3 different sides of the 3D bounding cage, a cuboid, and we can determine its dimensions. See this MathStackExchange for further explanation on the computation.
def euclidean_distance(p1, p2):
    """Return Euclidean Distance in m."""
    return np.sqrt(((p2 - p1) ** 2).sum())

# Get vertices of cuboid (3D bounding box)
box_pts = np.asarray(boundingbox_3d.get_box_points())

def get_distances(p, lst):
    distances = []
    for i, x in enumerate(lst):
        distances.append(euclidean_distance(p, x))
    return distances

def closest_points(lst, n):
    """Return n smallest numbers of a list"""
    sorted_lst = sorted([*enumerate(lst)], key=lambda x: x[1])
    return [lst[i+1][0] for i in range(n)]

# For example, the two closest points to p0
distances = get_distances(box_pts[0], box_pts)
closest_points(distances, 2)
Closing Thoughts
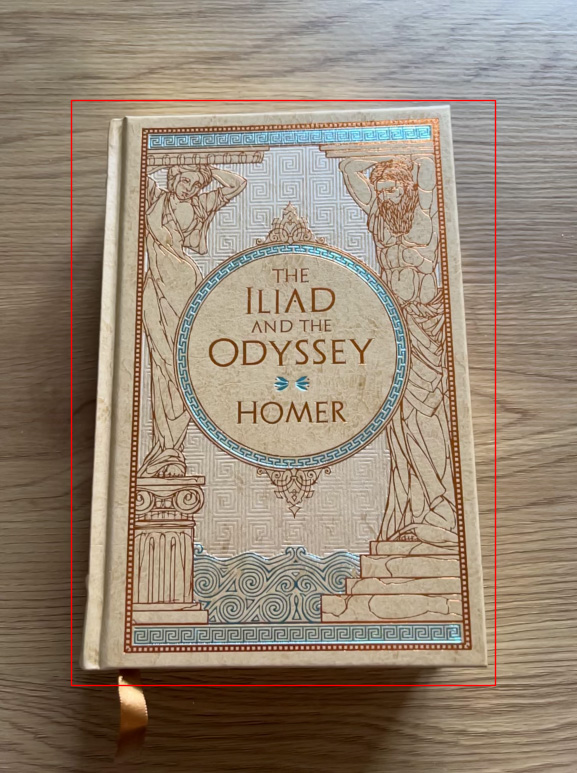
Finally, here is a fun experiment.
We used the code above to capture in 3D and measure the thickness of Homer's Iliad & The Odyssey.
With the code above, we measure the book to be 25.9 x 19.2 x 6.4 cm.
The actual book measures 22.8 6x 15.24 x 3.7 cm.
Some overestimation can be expected as the shared code has been simplified for purposes of illustration and the bounding cage does not encapsulating the object perfectly.
The presented approach is useful for establishing a quick baseline, but for a production-level application, additional more complex computations are required. The method should incorporate the camera confidence map, which can be used to denoise the depth data and discard points with low depth estimate confidence. Odometry data and a sliding window of a video sequence (multiple frames) can further be used to improve depth calculations.